Thursday, August 16, 2012

Fall wreath


With the kids going back to school, the leaves falling off the trees, and the weather cooling down scorching heat, it is starting to feel like fall is coming! It was time to pull down my summer time sandals on my door and put up a new wreath. I searched far and wide on pinterest for a good fall/autumn wreath but, nothing really struck me as my style. What to do, what to do... make my own of course! I scrolled through pages of ideas and came up with something that kind of mixed a bunch together. A trip to the craft store was in my future.

Here is what you need:
-wreath (I always buy the green foam ones since they are cheaper)
-bag of spanish moss
-floral bunches (I bought two with mixes in them)
-small foam pumpkins or other veggie that represents fall to you
-yarn (this is the standard cheaper yarn in a burnt orange)
-letter
-arcyrlic paint
-round sponge brush
-spray glue (I used elmers)
-hot glue gun

TOTAL: $40 and I have enough to make something else


-----------------------------------------
Instructions:

Step One: Use small round sponge brush to paint polka dots on wooden letter. Set aside to dry.

Step Two: Wrap yarn tightly around the wreath. Go about two-thirds around the wreath and make a knot at the end. I made an indent with my nail so I knew where to stop.

Step Three: Spray glue on the part of the wreath that does not have any yarn on it and carefully place moss. Make sure to not have any wreath showing (other than the back side which is fine).

Step Four: Pull the flowers and leaves off of the floral bunches and figure out where they would look best in the moss part of your wreath.

Step Five: Use the hot glue gun to place said pieces in step four.

Step Six: Tie the wooden letter with the same yarn used on the wreath. Tie tightly around the wreath.

Step Seven: Use yarn or ribbon to make the top hanging part of the wreath and tie off.

Step Eight: ENJOY!


Saturday, May 19, 2012

Fruit ice pops

Found these on pinterest and knew they would be a big hit with my kids, since they love ice pops!! We try to avoid artificial colors in our house since it makes my boys go a bit loco! We made them in the evening, and the first thing in the morning, the kids ran to the freezer to check if they were ready! I was able to save them for a playdate we had, and all the kids enjoyed them. The only thing I did differently was to cut the juice with water to reduce the sugar.

Original pin is from here
http://www.lilsugar.com/How-Make-Fresh-Fruit-Popsicles-18393455

Cut up fruit, we also used fresh strawberries and kiwi, some frozen blueberries and grapes I had in the freezer.

Fill the mold with the cut up fruit, then fill with juice/water mix, then add the sticks, we lost a handle, so made do with a Popsicle stick!


One of the kids enjoying the finished product!!

Cute homemade card

Found this super cute idea for cards to make from the kids for the grandmas for Mother's day.

Found the idea here
http://theeducatorsspinonit.blogspot.com/2011/09/grandparents-day-card.html

This is the version we made, basically took some scrap paper, and then got the kids to do their handprints, added a photo, and voila, a super cute card the grandmas loved!! I also made extras so I could keep them for myself!!


Friday, May 18, 2012

Kitchen Chalkboard


Chalkboards are all the craze right now. I loved the idea of having a chalkboard on the kitchen wall but I just could not bring myself to paint the wall with black. I took down a bunch of pictures to re-decorate a couple months ago and this frame was left over. The inspiration hit when I saw it sitting at the top of the stairs, empty, and such a big beautiful frame. 


Taking out the glass was the hardest part (believe it or not) as the manufacturer put the tabs in after they put the glass in. Once the glass was carefully removed, I painted the backing of the frame (it was a light weight wood) with chalkboard paint (3 coats) and let it dry. Once it was dry, I placed back in the frame and hung up.  My only quirk with it is when I write against the grain, it takes a little more effort. But all in all, it works just as well as it needs to!


Viola! A beautiful framed chalkboard in the kitchen without painting the wall!


Thursday, May 17, 2012

Mexican Pizza

Looking around on Pinterest the other day for a recipe, I came across a dish that looked SO good and easy to make! Out of all the ingredients I only needed the crescent rolls so I sent my husband on a quick grocery store run. The original recipe can be found here. The only thing I changed was no green onions and I put the tomatoes under the cheese. The kids (all 3 of them) had seconds and my husband scraped off the olives and had thirds on it! Also, we do not normally eat red meat but I thought I would stick with the recipe the first time through. Next time will be with ground turkey.

Pretty good, easy, fast dish if you ask me!

Ingredients:
1 lb. ground beef
1 envelope taco seasoning mix
2 (8 oz.) cans Pillsbury crescent rolls
1 (16 oz.) can refried beans (I used the jalapeƱo kind)
2-3 cups shredded cheddar cheese or Mexican blend
1/2 cup chopped tomatoes
1/4 cup sliced black olives
4 green onions, chopped

Directions:
Heat oven to 375 degrees. Brown ground beef or turkey and drain. Add any taco seasoning to the ground meat according to the package directions.

Unroll crescent rolls into rectangles. Place in ungreased 11 1/2 inch x 16 1/2 inch jelly roll pan or cookie sheet. Press dough over the bottom and 1/2 inch up sides to form crust. Bake at 375 oven for 11 to 13 
minutes or just until golden brown (this took about 15 minutes for me).

Microwave beans in a microwave safe bowl for 1 minute. Carefully spread beans over warm crust creating a thin layer.

Top with cooked meat mixture, sprinkle with cheese followed by tomatoes, black olives and green onion. Return to oven for 3-6 more minutes until cheese is melted. Serve immediately. 


Wednesday, May 9, 2012

Custom initial

As I am sure you have seen the initial of your last name displayed is very "in" right now. I, personally, love the look but everyone has one. Thinking about what I could possibly do to make it stand out, I thought about scrapbooking paper! It took less than 20 minutes to do (which is good if you have little kids like me) all while being easy and inexpensive.


What you will need:

  • Wooden initial - Mine was from Michaels and cost under $3 
  • Scrapbooking Paper cut up squares - I have a bunch that I saved from other projects or you can just cut up 3 pages into squares and rectangles.
  • Mod Podge
  • Small Paint Brush
  • Spray Adhesive
What you do:
  • Lay your wooden initial down on a clean surface. 
  • Pick up a retangle and figure out where it would fit best. You may need to trim here and there but really the more colors and shapes the better anyway!
  • Mod Podge each strip with paint brush and lay down on letter. 
  • Once you have them down go over the seams with more mod podge making sure to spread evenly to not leave white streaks.
  • Take outside and spray with adhesive
  • Let dry :-)
Super easy and you can customize to the colors of your home or room it will be displayed in.

ENJOY!


Monday, May 7, 2012

Magnetic Chalkboard


As I am sure you have all seen the oil drip pan magnetic board is all over Pinterest at the moment. I thought it was a good idea but I am not a fan of the bright silver hanging on a wall. After a lot of thought, I came to the decision to paint the pan with chalkboard paint. What an amazing deal to have a huge magnetic chalkboard for the kids for under $30!

Here are some examples floating around from Pinterest at the moment. You can click the picture and it will take you to the original source.


I set about on my project. Laying the oil drip pan flat on our outdoor table, we painted 3 coats of the chalkboard paint and let dry for 24 hours (it was in the sun also, so I am sure it dried pretty quickly). Afterwards, I brought it inside and hung up with no damage 2 way tape to the wall. I was a little skeptical it would hold but so far so good and it feels pretty sturdy. I kept staring at the board thinking it needed something else. Digging through our stash of paint, I discovered a paint sample 1/2 pint I bought in the oops paint section a while back (it was 50 cents and who can resist that?!). Taping off the edges of the pan with painters tape (I only use the green tape now!) and set about to paint the edges. I am very happy with the finished product, and so are my kids!


Oil Drip Pan - $10 at Walmart
Chalkboard Paint - $15 (for a lot more than I used so this can be used for several other projects)
Painters Tape - $0 (already had)
Paint - $0 (already had)
  TOTAL - $25


Monday, April 23, 2012

Home inspiration

Home inspiration. Okay, so we moved to our home when I was 22 weeks pregnant with our twins and had an almost 2 year old running around. House decorating got put on hold for a little while... well honestly until recently. My living room is the first room you see when you walk in the door and really left something to be desired.


I did what any person would do, and enlisted to help of my facebook friends. Everyone had a suggestion: painting the walls, putting up art work, moving things around. Then one friend asked if she could come over to help me. And that she did! Not only did she come with suggestions but she brought things with her to show me what it would look like. I took her ideas and ran with it! The end product, I am definitely proud of and wanted to show you what under $200 in just a few purchases can really do to a home!


Ikea white shadow frames with matting: $19.99 each. Scrapbooking paper: already on hand (but if you bought it would be about $1 each). Throw pillows from discount store: $40 total. Tree bought 2nd hand for $20. The lamp was being thrown out by its owner since the shade broke. It was a brown color. We changed the color (spray paint) and glued the shade back together and viola!


Hope this inspires you to look around 2nd hand and keep your eyes peeled for some good deals!


Friday, April 20, 2012

Chicken Thigh Quick Meal

While at Costco the other day I saw some chicken thighs and thought I could find something to do with them. We normally eat chicken breasts so this would be fun to find a new recipe. This quick meal comes from All Recipes with a few modifications of my own.


Recipe:
1/2 cup butter (a full stick)
2 tablespoons soy sauce
1 tablespoon balsamic vinegar
1/4 teaspoon pepper
1 tablespoon dried parsley
6-7 chicken thighs (mine were bone-in and had skin)

  • Preheat the oven broiler. I had it set on the convection oven. Lightly grease a baking pan (I use Pam butter flavor)


    In a microwave safe bowl, mix the butter, soy sauce, pepper, and parsley. On high, I microwaved for 1 minute, stirred, and returned for 30 more seconds.


    Arrange chicken on the baking pan, and coat with the butter mixture, reserving some of the mixture for basting.

    Broil chicken for 30 minutes in preheated oven, until juices run clear, turning every 5 minutes and basting with remaining butter mixture. Sprinkle with parsley to serve.

    I paired this with the glaze carrot recipe I will be writing right after this as well as Radiatori noodles. This is a great meal to pair with rice though as well.

    Enjoy!


Saturday, April 14, 2012

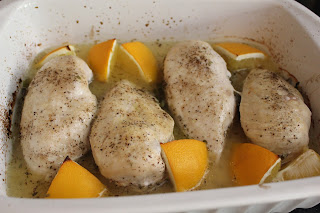
Lemon Chicken

Okay, so I have had this one recipe pinned for awhile now. Today, I decided to give it a shot. Here is the original recipe, and below is what I actually did. I had one fresh lemon on hand so I improvised a little bit and my husband is allergic to garlic so you will see I omit that ingredient most of the time.


Recipe:
1/4 cup extra virgin olive oil 
1/3 cup white wine
2 tablespoons lemon juice
1½ teaspoons dried oregano
1 teaspoon minced fresh thyme leaves
Kosher salt and freshly ground black pepper
4 boneless chicken breasts, skinless
1 lemon 


Preheat the oven to 400 degrees.
Warm the olive oil in a small saucepan over medium-low heat, turn off the heat, add the white wine, lemon zest, lemon juice, oregano, thyme, and 1 teaspoon salt and pour into a 9 X 12-inch baking dish. 

Pat the chicken breasts dry and place them smooth side up over the sauce. Brush the chicken breasts with olive oil and sprinkle them liberally with salt and pepper. Cut the lemon in 8 wedges and tuck it among the pieces of chicken.


Bake for 30 to 40 minutes, depending on the size of the chicken breasts, until the chicken is done and the skin is lightly browned. If the chicken isn’t browned enough, put it under the broiler for 2 minutes. Cover the pan tightly with aluminum foil and allow to rest for 10 minutes. Sprinkle with salt and serve hot with the pan juices. 


Now because I used skinless, it did not brown (even with going in the broiler). I also thought I covered the breasts in salt but it could have used more, so don't be afraid of that step like I was. The final outcome was good. I have had tastier chicken but this was juicy and was rather healthy. My 2 year old twins gobbled it up and asked for seconds. I also paired with rice this time but I think this is a dish more suited for potatoes.


Thursday, April 12, 2012

Easter Egg garland

Got this idea from pinterest, and it was a quick and easy project. The first time I tried it I used thread, but my son pulled on it and it broke. I re-did it using ribbon to be able to keep it up until Easter! I even put it in my Easter box and plan to bring it out next year! This is a bad pic, but the only one I have.

Here is the original pin 


Nutella, Strawberry & Banana crepes

This is was of my most favorite dishes I have EVER made, I seriously think I could eat this everyday!

It looks great and is fairly easy to make. This is too good to only be made on holidays! I made this for Easter morning, and can't wait to make it again!!

Here is where I found the recipe.

BASIC CREPE (recipe via)
What you need:
1 cup flour
2 eggs
1/2 cup milk
1/2 cup water
Pinch of salt
2 tbsp melted butter
What you do:
1. In a medium mixing bowl, mix together flour and eggs (it’ll obviously be very thick and paste-y).
2. Slowly mix in the milk and water, whisking constantly.
3. Add salt and butter; beat until smooth.
4. Heat your crepe pan or frying pan and oil lightly (you need to start working with the batter right away, or the butter will begin to congeal and make it lumpy).
5. Scoop about 1/4 cup batter into the center and then tilt the pan in a circular motion until the batter spreads out evenly. Important: do not walk away from the stove at any point during this process – it’s very speedy, and you need to monitor it closely.
6. Cook the crepe for 1-2 minutes, or until the first side is lightly golden, then loosen with a spatula, flip, and cook the other side.
I was able to get 5 crepes out of this – I filled two with Nutella, bananas, and strawberries, and sprinkled the other three with lemon juice and superfine sugar. Amaaaazing.


Seriously go make this NOW!!

Easter Egg Cupcakes

So in this post I am actually combing two pins to share. I love mandarin cake, so decided to try this cake recipe and make cupcakes with it.
The original recipe can be found here.

Mandarin Magic Cake

Yield: 24 servings.
1 (18 oz.) yellow cake mix
4 eggs
1/2 cup oil
1 (11 ounce) can mandarin oranges and juice
1 (20 ounce) can crushed pineapple
1 small box instant vanilla pudding mix
9 oz. Cool Whip
Preheat oven to 350 degrees. Mix together cake mix, eggs, oil, and mandarin oranges and juice; pour into a 9 by 13 inch greased and floured pan. Bake for 30 minutes or until done. Mix the whole can of pineapple along with the juices with pudding powder and Cool Whip. Spread over the cooled cake. Keep this cake refrigerated.

Now I skipped the frosting, because we are making these for an easter egg hunt and they must be kept refrigerated, but I have tried this frosting and it is delicious!!

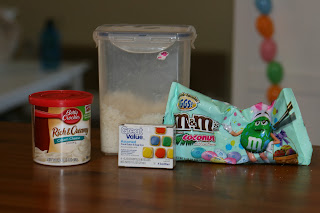
 Ingredients for the cupcakes


 Ingredients for the frosting, I think mixed green food coloring to the coconut then we stuck it onto the frosted cupcakes, then added M&M eggs. It was fun to do with the kids!

They were perfect to take to the Karate school easter egg hunt potluck!

This is the link for the idea for the cupcakes.